DetourAI避障
MassCrowd避障算法原理
UE5中Mass的避障算法相对比较简单,概括来说就是遍历附近Agent和非闪避Obstacle(一般就是地图障碍物和玩家),算出一个避障的力(单位速度方向)来实现,这个力分为远离力SeparationForce,避障力AvoidForce和障碍力法线ForcedNormal。可以查看UMassMovingAvoidanceProcessor::Execute代码来看到三者的计算方法。
对于Agent的闪避,会计算远离力SeparationForce,闪避力AvoidForce。
远离力只会在两Agent的圆心距离大于两Agent的半径+MovingAvoidanceParams.ObstacleSeparationDistance参数的情况下才会计算并使用,它其实就是其他Agent位置减去自身Agent位置作为速度矢量,即AgentLocation - Collider.Location。代码如下:
代码解释
代码改写
1
2
3
4
5
6
7
8
9
10
11
12
13
14
15
16
17
//其他Agent相对方向作为远离力方向
FVector RelPos = AgentLocation - Collider.Location;
RelPos.Z = 0.; // we assume we work on a flat plane for now
const FVector RelVel = DesVel - Collider.Velocity;
const FVector::FReal ConDist = RelPos.Size();
const FVector ConNorm = ConDist > 0. ? RelPos / ConDist : FVector::ForwardVector;

FVector SeparationNormal = ConNorm;

const FVector::FReal StandingScaling = Collider.bIsMoving ? 1. : MovingAvoidanceParams.StandingObstacleAvoidanceScale; // Care less about standing agents so that we can push through standing crowd.

// 计算PenSep表示越接近其他Agent,力越大
// 若PenSep为0,即超过ObstacleSeparationDistance配置值,SeparationForce为0
const FVector::FReal PenSep = (SeparationAgentRadius + Collider.Radius + MovingAvoidanceParams.ObstacleSeparationDistance) - ConDist;
const FVector::FReal SeparationMag = FMath::Square(FMath::Clamp(PenSep / MovingAvoidanceParams.ObstacleSeparationDistance, 0., 1.));
const FVector SepForce = SeparationNormal * MovingAvoidanceParams.ObstacleSeparationStiffness;
const FVector SeparationForce = SepForce * SeparationMag * StandingScaling;
避障力则是获取两Agent在运动期间距离最接近的点AvoidRelPos作为力的反方向,从而让两Agent尽可能地远离。
如何获取AvoidRelPos涉及到CPA(Closest Point of Approach)算法,似乎是航空安全方面常用的算法,如下图类似情形(来自谷歌关键字搜图):
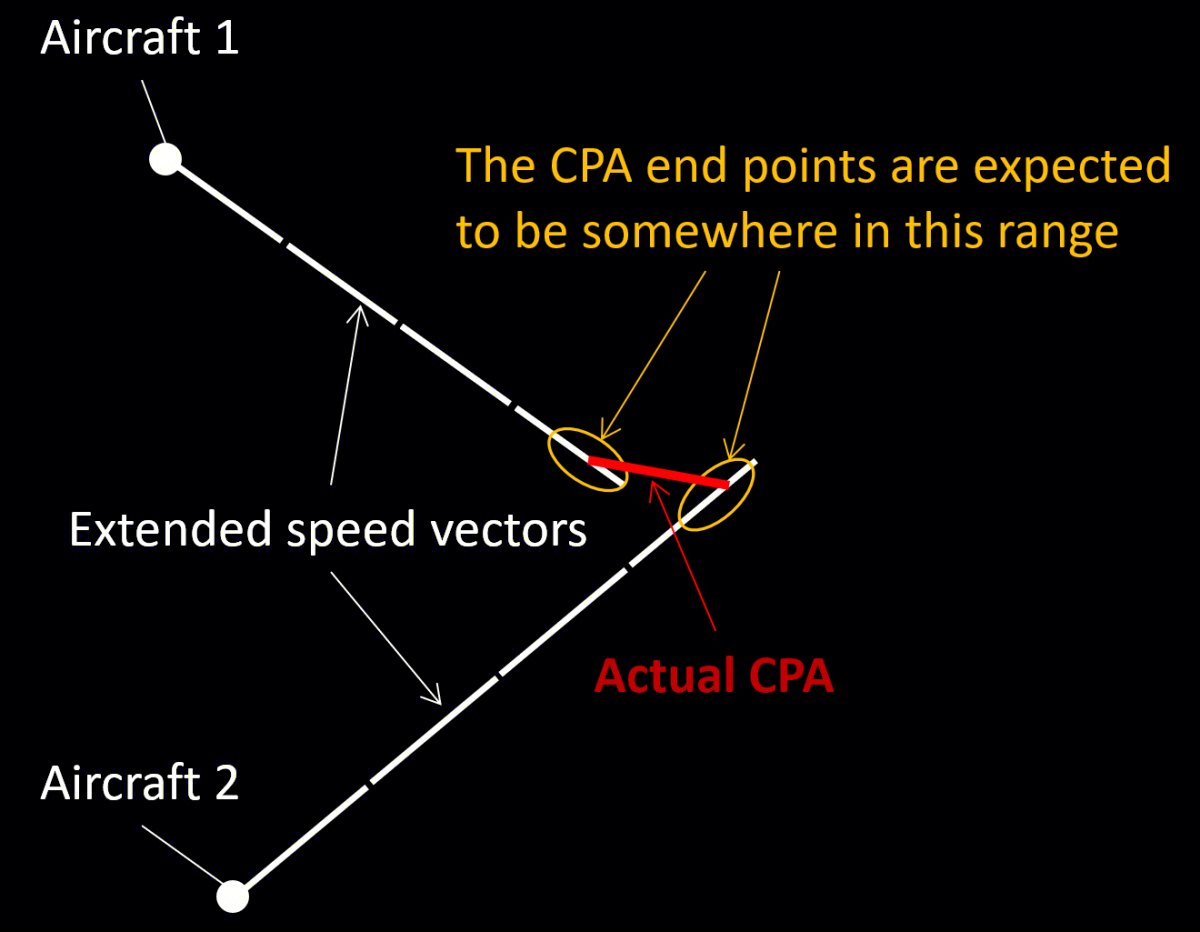
CPA的快速做法是转化为一个一元二次方程问题(公式1): \(d^2=R^2+2 \vec{R} \cdot \overrightarrow{V_{\text {rel }}} t+\left(V_{\text {rel }} t\right)^2\) 其中t是飞行时间,R是两Agent相对位置,V是相对速度。
根据一元二次方程,求抛物线最小值d,可以通过求根公式得出抛物线的最低点: \(t_{1,2}=\frac{-b \pm \sqrt{b^2-4 a c}}{2 a}\) 来求出t的值,然后通过: \(P_0 + t * \overrightarrow{V_{\text {rel }}}\) 求出最短距离的位置AvoidRelPos。
简单解释一下上面一元二次方程怎么来的,要求Agent的某一时刻的距离D,如下公式: \(\vec{D}(t)=\left(\vec{P}_2(0)+\vec{V}_2 t\right)-\left(\vec{P}_1(0)+\vec{V}_1 t\right)=\vec{R}+\overrightarrow{V_{\text {rel }}} t\) P(0)是两个Agent各自的初始位置,V则是速度向量。然后等式两边进行平方,目的是将所有向量都变成标量: \(d^2=\vec{D}(t) \cdot \vec{D}(t)=\left(\vec{R}+\overrightarrow{V_{\text {rel }}} t\right) \cdot\left(\vec{R}+\overrightarrow{V_{\text {rel }}} t\right)\) 然后即可得出上述公式1。
可以看看ChatGPT更加详细的解释:
Let’s start from the beginning and derive the expression for $d^2$ that you see in step 3. We have two objects, Agent 1 and Agent 2, with positions $\vec{P_1}$ and $\vec{P_2}$ respectively, and velocities $\vec{V_1}$ and $\vec{V_2}$. The relative position of Agent 2 with respect to Agent 1 is given by $\vec{R} = \vec{P_2} - \vec{P_1}$. Similarly, the relative velocity is $\vec{V_{rel}} = \vec{V_2} - \vec{V_1}$.
At time $t$, the distance between the two agents is the magnitude of the vector $\vec{D}(t) = \vec{P_2}(t) - \vec{P_1}(t)$. Since the motion of both agents is governed by their respective velocities, we can express the positions at time $t$ as $\vec{P_1}(t) = \vec{P_1}(0) + \vec{V_1}t$ and $\vec{P_2}(t) = \vec{P_2}(0) + \vec{V_2}t$. Here, $\vec{P_1}(0)$ and $\vec{P_2}(0)$ are the initial positions of Agent 1 and Agent 2 at time $t=0$.
Substituting these expressions into $\vec{D}(t)$, we get $\vec{D}(t) = (\vec{P_2}(0) + \vec{V_2}t) - (\vec{P_1}(0) + \vec{V_1}t) = \vec{R} + \vec{V_{rel}}t$. The square of the distance between the two agents, denoted as $d^2$, is then given by the dot product of $\vec{D}(t)$ with itself:
\[d^2 = \vec{D}(t) \cdot \vec{D}(t) = (\vec{R} + \vec{V_{rel}}t) \cdot (\vec{R} + \vec{V_{rel}}t)\]Expanding this dot product will lead us to the expression you’re looking for:
\[d^2 = \vec{R} \cdot \vec{R} + 2\vec{R} \cdot \vec{V_{rel}}t + (\vec{V_{rel}}t) \cdot (\vec{V_{rel}}t)\]This simplifies to:
\[d^2 = R^2 + 2 \vec{R} \cdot \vec{V_{rel}}t + (V_{rel}t)^2\]which is the equation mentioned in step 3. Let’s not forget that the dot product $\vec{R} \cdot \vec{V_{rel}}$ is a scalar and can be written as $R \cdot V_{rel} \cdot \cos(\theta)$, where $\theta$ is the angle between $\vec{R}$ and $\vec{V_{rel}}$. But since we’re only interested in the general form of the equation, we’ll stick with the more abstract notation.
With this derivation, we now understand where the expression for $d^2$ comes from. It represents the squared distance between the two agents as a function of time, taking into account their relative position and velocity. Now, we can proceed to solve for the time to closest approach using this equation. If you need further clarification or want to go through the steps of solving the quadratic equation, feel free to ask!
The expression for $d^2$ in step 3 is given by:
\[d^2 = R^2 - 2RV_{rel}t + V_{rel}^2t^2\]This equation represents the squared distance between the two agents as a function of time. Now that we’ve derived this expression and understand its components, we can proceed with solving for the time to closest approach.
DetourCrowd避障算法原理
UE的DetourCrowd算法指的是UE古早开始就自带的AIController避障,其基于RVO算法且做了多种优化和特性。RVO算法基本原理这里不多赘述,可见网上诸多文章或者原论文:
https://gamma.cs.unc.edu/RVO/icra2008.pdf
https://medium.com/@suraj2596/paper-review-reciprocal-velocity-obstacles-for-real-time-multi-agent-navigation-aaf6adbedefd
RVO2/ORCA:
https://gamma.cs.unc.edu/ORCA/publications/ORCA.pdf
可视化调试
打开ai.crowd.DebugSelectedActors 1和ai.crowd.DrawDebugVelocityObstacles 1可视化调试以显示避障速度方向、速度环、障碍线段等。
算法概览
DetourCrowd避障算法以NavMesh数据作为静态障碍数据,其他CrowdAgent以圆作为动态障碍数据;
通过采样速度环获取数个适合的速度方向,并通过RVO算法获取最优运动方向。
然后输出运动方向到CharacterMovement执行移动。
采样速度环
采样速度环用于采样当前速度方向的所有合适速度方向,以修正更为适合的速度方向。
要修正合适的速度方向,输入的有当前速度方向vel,期望速度方向dvel和最终输出的最合适的方向nvel。
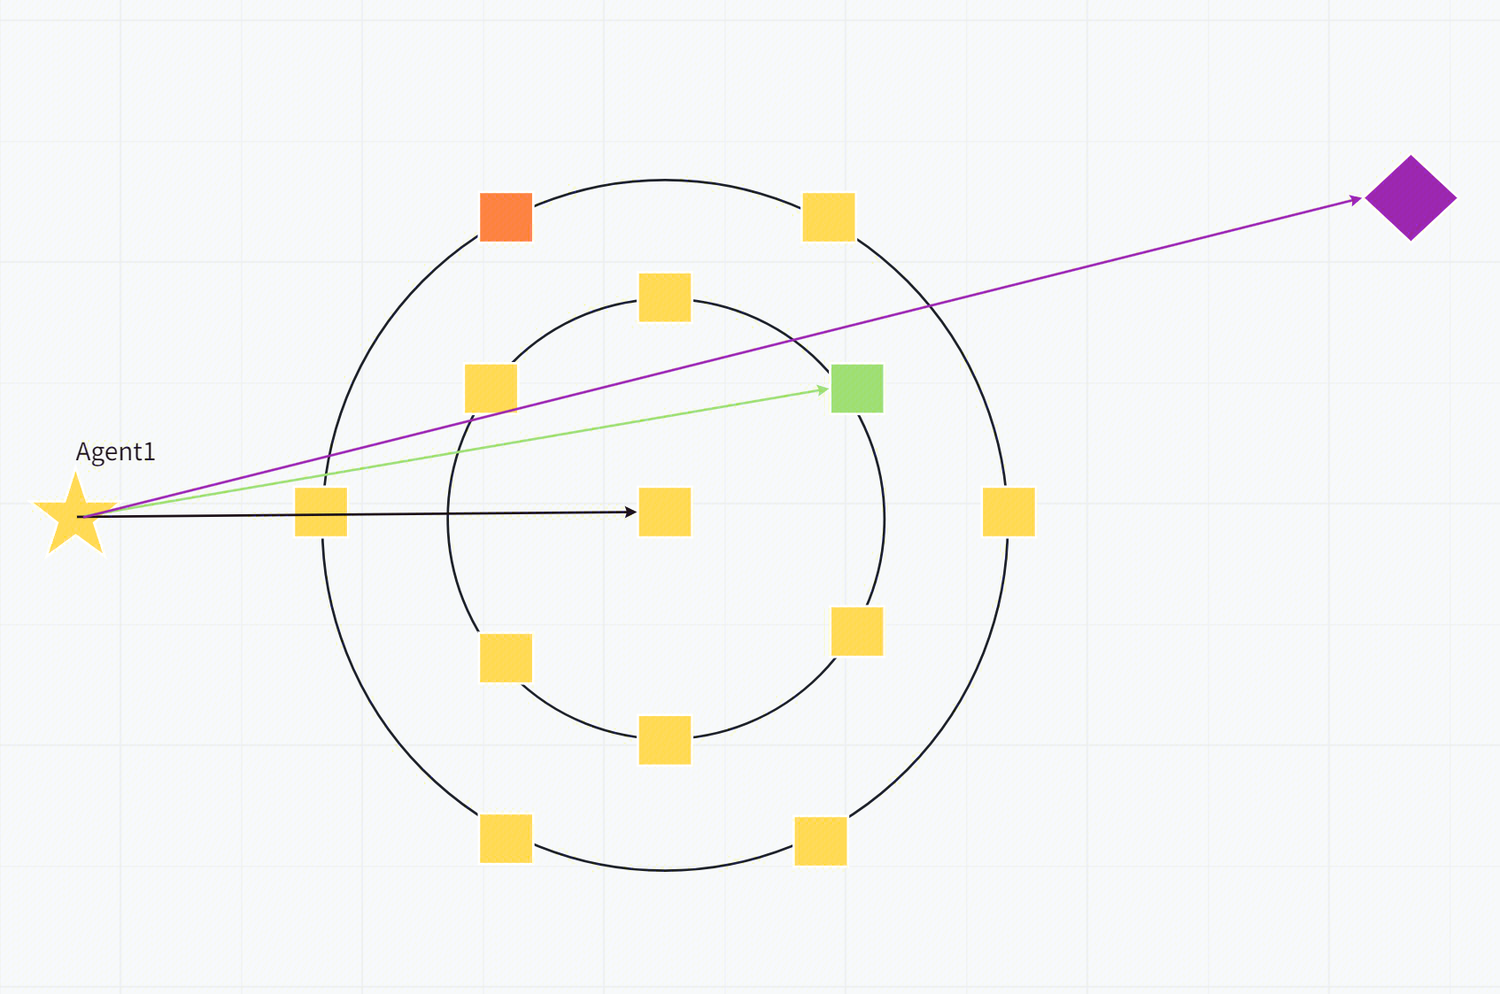
上图(图1)中为两个圆环的速度环。
星星为当前Agent的位置,方块为速度环的采样位置,偏向红色为penalty较大,反之绿色为较小。黑色箭头为当前速度方向vel,可见速度环是在速度矢量终点作为环心。紫色菱形为Agent寻路目标,紫色箭头为期望速度方向dvel。绿色箭头为最合适速度方向nvel,是penalty最小的值。
那么速度环是如何采样的呢,UE默认使用交错平均采样的方式,即圆环根据周长平均采样,然后从里到外每个圆环交错地采样,这样能让速度方向均匀分布。上图是每个圆环采样五次的结果。
圆环在采样的时候最大的圆半径是1,实际大小(可视化调试显示的大小)需要乘以适当速度大小(见下文)。
主要代码:
1
2
3
4
5
6
7
8
9
10
11
12
13
14
15
16
17
18
19
20
21
22
23
24
25
26
27
28
29
30
31
// Build sampling pattern aligned to desired velocity.
dtReal pat[(DT_MAX_PATTERN_DIVS*DT_MAX_PATTERN_RINGS+1)*2];
int npat = 0;

const int ndivs = (int)m_params.adaptiveDivs;
const int nrings= (int)m_params.adaptiveRings;
const int depth = (int)m_params.adaptiveDepth;

const int nd = dtClamp(ndivs, 1, DT_MAX_PATTERN_DIVS);
const int nr = dtClamp(nrings, 1, DT_MAX_PATTERN_RINGS);
const dtReal da = (dtReal(1.)/nd) * DT_PI*2;
const dtReal dang = dtAtan2(dvel[2], dvel[0]);

// Always add sample at zero
pat[npat*2+0] = 0;
pat[npat*2+1] = 0;
npat++;

for (int j = 0; j < nr; ++j)
{
  const dtReal r = (dtReal)(nr-j)/(dtReal)nr;
  dtReal a = dang + dtReal(j&1)*0.5f*da; //j&1交错采样
  for (int i = 0; i < nd; ++i)
  {
    //圆的参数方程
    pat[npat*2+0] = dtCos(a)*r;
    pat[npat*2+1] = dtSin(a)*r;
    npat++;
    a += da;
  }
}
选择最优速度向量
在计算最优速度向量之前,这里有个参数m_params.velBias,用于选择期望速度dvel的大小,还是选择vmax(即角色CMC配置的速度最大值)大小。当m_params.velBias为1,偏向于dvel大小,为0则偏向于vmax大小。
而采样的速度向量,则是期望速度方向和速度环的方向的向量和vcand,或者说两者“合速度”,从而在期望速度方向和躲避速度方向中间权衡。即图1中紫色和绿色向量的向量和,当然也需要乘以上述的偏移值,即dvel*m_params.velBias + pat*(1 - m_params.velBias),pat为当前采样到的速度向量。
得到vcand后,需要计算惩罚值penalty,属于RVO算法的一环。penalty越小,则作为最优先的选择。
最终通过上述流程,计算所有速度环方块的所有速度矢量的penalty,选择最小的penalty为最终速度向量。
1
2
3
4
5
6
7
8
9
10
11
12
13
14
15
16
17
18
19
20
21
22
23
24
25
26
27
28
29
30
31
32
33
34
35
36
37
38
39
40
41
42
43
//根据m_params.velBias偏移计算偏向于期望速度还是最大CMC速度
dtReal cr = vmax * vmult * (1.0f - m_params.velBias);
dtReal res[3];
dtVset(res, dvel[0] * m_params.velBias, 0, dvel[2] * m_params.velBias);
int ns = 0;

const dtReal invVmult = 1.0f / vmult;
for (int k = 0; k < depth; ++k)
{
  dtReal minPenalty = DT_REAL_MAX;
  dtReal bvel[3];
  dtVset(bvel, 0,0,0);

  for (int i = 0; i < npat; ++i)
  {
    //计算向量和
    dtReal vcand[3];
    vcand[0] = res[0] + pat[i*2+0]*cr;
    vcand[1] = 0;
    vcand[2] = res[2] + pat[i*2+1]*cr;

    //偏移了也不能超过最大CMC速度
    if (dtSqr(vcand[0])+dtSqr(vcand[2]) > dtSqr((vmax * vmult)+0.001f)) continue;

    //计算penalty值
    const dtReal penalty = processSample(vcand,cr/10, pos,rad,vel,dvel, debug);
    ns++;
    if (penalty < minPenalty && penalty >= 0.0f)
    {
      //迭代最小penalty值
      minPenalty = penalty;
      dtVcopy(bvel, vcand);
    }
  }

  dtVscale(res, bvel, invVmult);

  //缩小速度环进行多次迭代,提高精度
  cr *= 0.5f;
}

//最终速度nvel
dtVcopy(nvel, res);
惩罚值计算
本文建议结合前置的RVO论文来看。
要计算当前采样速度的惩罚值penalty,主要涉及计算两个部分:离其他Agent的最小时间,以及离其他静态场景障碍的最小时间。
计算离其他Agent的最小时间,首先确保在当前相对速度下不会发生碰撞,而Agent则均被简化为带速度的圆来考虑。
是否会发生碰撞是涉及到VO(Velocity Obstacle)问题,首先需要计算当前Agent与其他Agent的相对速度,然后根据两圆的闵可夫斯基和与相对速度射线求交来确定是否会重叠:
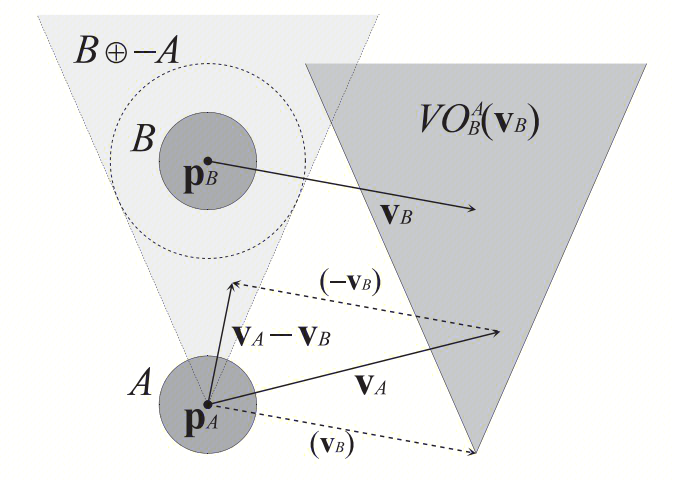
| 上图(图2)是描绘VO的一个情景,来自前置RVO论文。其中A是Agent本身,B是其他Agent,它们都以一个圆作为碰撞体积。 $p_{A}p_{B}$ 分别是A、B两Agent的圆心位置, $v_{A}v_{B}$ 则分别其速度,$v_{A} - v_{B}$ 则是两者的相对速度,$B \oplus-A$则是其闵可夫斯基和,如图虚线圆部分,-A是表示为−A = {−a | a ∈ A}。 |
然后射线公式: \(\lambda(\mathbf{p}, \mathbf{v})=\{\mathbf{p}+t \mathbf{v} \mid t \geq 0\}\) 表示p点经过t时间和速度v的一条射线,两者是否相交可以表达为: \(V O_B^A\left(\mathbf{v}_B\right)=\left\{\mathbf{v}_A \mid \lambda\left(\mathbf{p}_A, \mathbf{v}_A-\mathbf{v}_B\right) \cap B \oplus-A \neq \emptyset\right\}\) 也即是说若$\mathbf{v}A \in V O_B^A\left(\mathbf{v}_B\right)$,则表示可能发生碰撞,如上图$v{A} - v_{B} $ 则在浅色三角形范围内。代码如下
1
2
3
4
5
6
7
8
9
10
11
12
13
14
15
16
17
18
19
20
21
22
static int sweepCircleCircle(const dtReal* c0, const dtReal r0, const dtReal* v,
							 const dtReal* c1, const dtReal r1,
							 dtReal& tmin, dtReal& tmax)
{
	static const dtReal EPS = 0.0001f;
	dtReal s[3];
	dtVsub(s,c1,c0);
	dtReal r = r0+r1;
	dtReal c = dtVdot2D(s,s) - r*r;
	dtReal a = dtVdot2D(v,v);
	if (a < EPS) return 0;	// not moving

	// Overlap, calc time to exit.
	dtReal b = dtVdot2D(v,s);
	dtReal d = b*b - a*c;
	if (d < 0.0f) return 0; // no intersection.
	a = 1.0f / a;
	const dtReal rd = dtSqrt(d);
	tmin = (b - rd) * a;
	tmax = (b + rd) * a;
	return 1;
}
其中c0,c1,r0,r1是两圆位置和半径,v是相对速度。函数最终输出是否发生碰撞和发生碰撞的时间。
然后为了解决重复使用旧速度的非协调性问题(见论文Section3的C部分),需要用到RVO(Reciprocal Velocity Obstacle)。 \(R V O_B^A\left(\mathbf{v}_B, \mathbf{v}_A\right)=\left\{\mathbf{v}_A^{\prime} \mid 2 \mathbf{v}_A^{\prime}-\mathbf{v}_A \in V O_B^A\left(\mathbf{v}_B\right)\right\}\) RVO是通过AB两个Agent的双向错开速度来解决抖动问题,代码如下:
1
2
3
4
5
6
7
8
// RVO
dtReal vab[3];
dtVscale(vab, vcand, 2);
dtVsub(vab, vab, vel);
dtVsub(vab, vab, cir->vel);

// Side
side += dtClamp(dtMin(dtVdot2D(cir->dp,vab)*0.5f+0.5f, dtVdot2D(cir->np,vab)*2), 0.0f, 1.0f);
上面段部分(RVO注释)是上面RVO定义公式的相对速度计算,即(2*vcand - vel) - cir->vel,即一半考虑当前(A)的当前(上帧)速度,一半考虑其他(B)的速度,来作为相对速度来计算是否碰撞和碰撞时间。
下半部分(Side注释)则是两个AB要运动的左面还是右面。
Recast使用NavMesh的碰撞边作为penalty计算在内的一部分,这样在Agent避障决策阶段就能决定选择更优的避障方向,相对于Agent决策结束后再使用NavMesh避障来说实现更加平滑,效果更佳。
方法是通过速度向量,测试NavMesh的碰撞边缘的线段是否与其相交,并且获取最小相交时间。
代码如下:
1
2
3
4
5
6
7
8
9
10
11
12
13
14
15
16
17
18
19
20
21
22
23
24
25
26
27
28
29
30
31
32
33
34
35
36
37
38
39
40
41
42
43
44
45
const dtReal TooCloseToSegmentDistPct = 0.1f;
for (int i = 0; i < m_nsegments; ++i)
{
  const dtObstacleSegment* seg = &m_segments[i];
  dtReal htmin = 0;

  //Agent在线段上,此时应该直接不考虑此速度而返回,但注意也会检测是否与线段平行的情况。
  if (seg->touch)
  {
    // Special case when the agent is very close to the segment.
    dtReal sdir[3], snorm[3];
    dtVsub(sdir, seg->q, seg->p);
    snorm[0] = -sdir[2];
    snorm[2] = sdir[0];
    // If the velocity is pointing towards the segment, no collision.
    if (dtVdot2D(snorm, vcand) < 0.0f)
      continue;
    // Else immediate collision.
    htmin = 0.0f;
  }
  else
  {
    //线段是否与速度射线相交,并求出相交时间
    if (!isectRaySeg(pos, vcand, seg->p, seg->q, htmin))
      continue;

    if (seg->canIgnore && htmin > TooCloseToSegmentDistPct)
    {
      htmin = 1.0f;
    }
  }

  // UE: when sample is too close to segment (navmesh wall) - disable it completely
  if (htmin < TooCloseToSegmentDistPct)
  {
    return -1.0f;
  }

  // Avoid less when facing walls.
  htmin *= 2.0f;

  // The closest obstacle is somewhere ahead of us, keep track of nearest obstacle.
  if (htmin < tmin)
    tmin = htmin;
}
可以看到上面注释,UE是改了部分实现方式,见Recast源码,UE遇到t小于0.1的值直接不考虑,防止碰撞抖动发生,而Recast本身是根据最近最小的penalty值计算出tThresold,小于此值才不考虑,孰优孰劣得测试一下才知道了。
终于,通过Agent和静态障碍物的计算,我们得出一个最小的碰撞时间,从而求得penalty,代码如下:
1
2
3
4
5
6
const dtReal vpen = m_params.weightDesVel * (dtVdist2D(vcand, dvel) * m_invVmax);
const dtReal vcpen = m_params.weightCurVel * (dtVdist2D(vcand, vel) * m_invVmax);
const dtReal spen = m_params.weightSide * side;
const dtReal tpen = m_params.weightToi * (1.0f/(0.1f+tmin*m_invHorizTime));

const dtReal penalty = vpen + vcpen + spen + tpen;
m_params.weightDesVel是与期望速度的差距权值,m_params.weightCurVel是与当前速度差距的权值,m_params.weightSide是左右方位的权重值,m_params.weightToi则是碰撞时间的权重值了。最终把所有不同权重的值相加则得到我们所需的penalty。
CrowdManager参数
明白原理参数就很好解释了,CrowdManager提供多中避障品质来实现不同LOD下的避障:

参数有点多,懒得一个个解释了,可以结合上述的图和阐述来看源码里的参数:D
Detour与MassAvoidance结合
由于Mass自带的CrowdAvoidance,虽然已经实现了人群间的避障,但是似乎并不支持地图静态物体和场景的避障。而且人群避障效果也并不好(有时候会后退挤压)。
UE中的Detour不但实现的Crowd的避障,而且由于是基于NavMesh实现的移动能避开地图障碍,效果也不错。
因此把Detour移植到Mass就能大大优化现有的避障效果,结合MassAvoidance本身的避障更加平滑,和Mass框架本身的高性能,能很好实现大世界Crowd的避障。
下图为Detour Crowd的主要类的关系图。
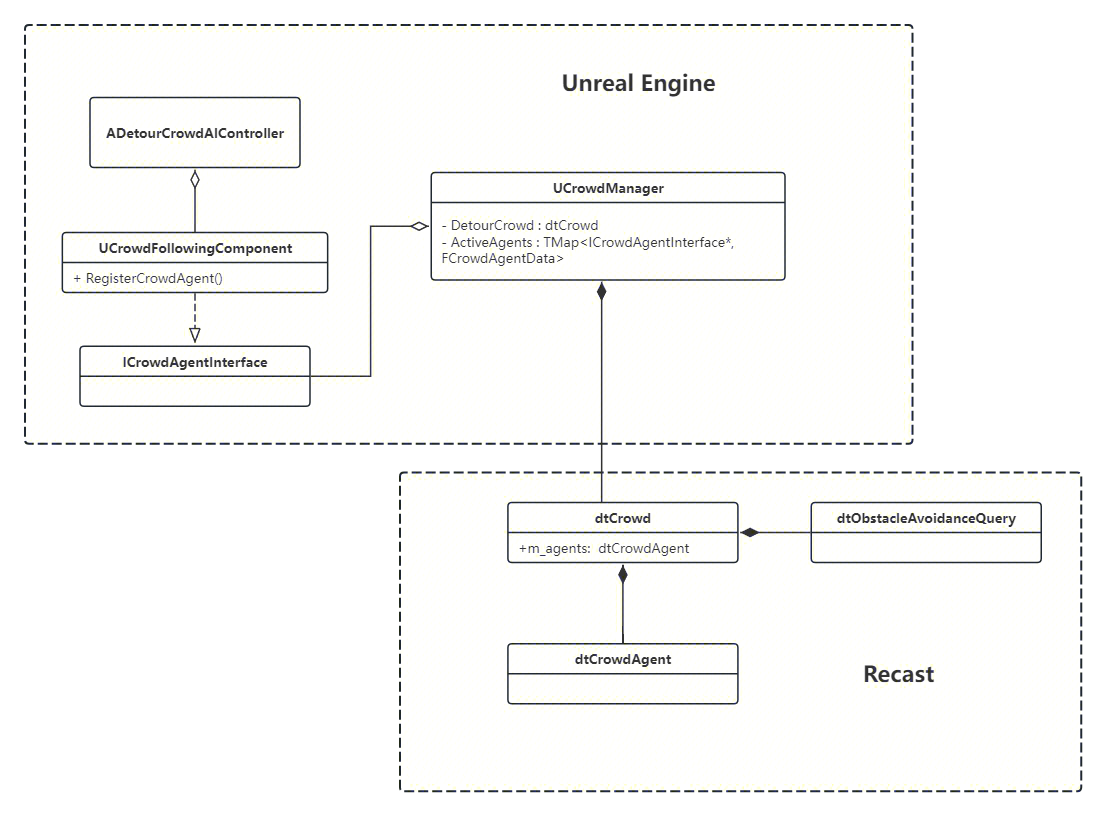
DetourCrowd主要核心实现在Recast的dtCrowd中,然后通过CrowdManager进行组织调用,换句话说UE的Crowd是通过Recast的DetourCrowd实现人群和避障,并且修改了部分代码。
https://github.com/recastnavigation/recastnavigation
执行流程如下,此图来自packtpub的Crowd教程原文:
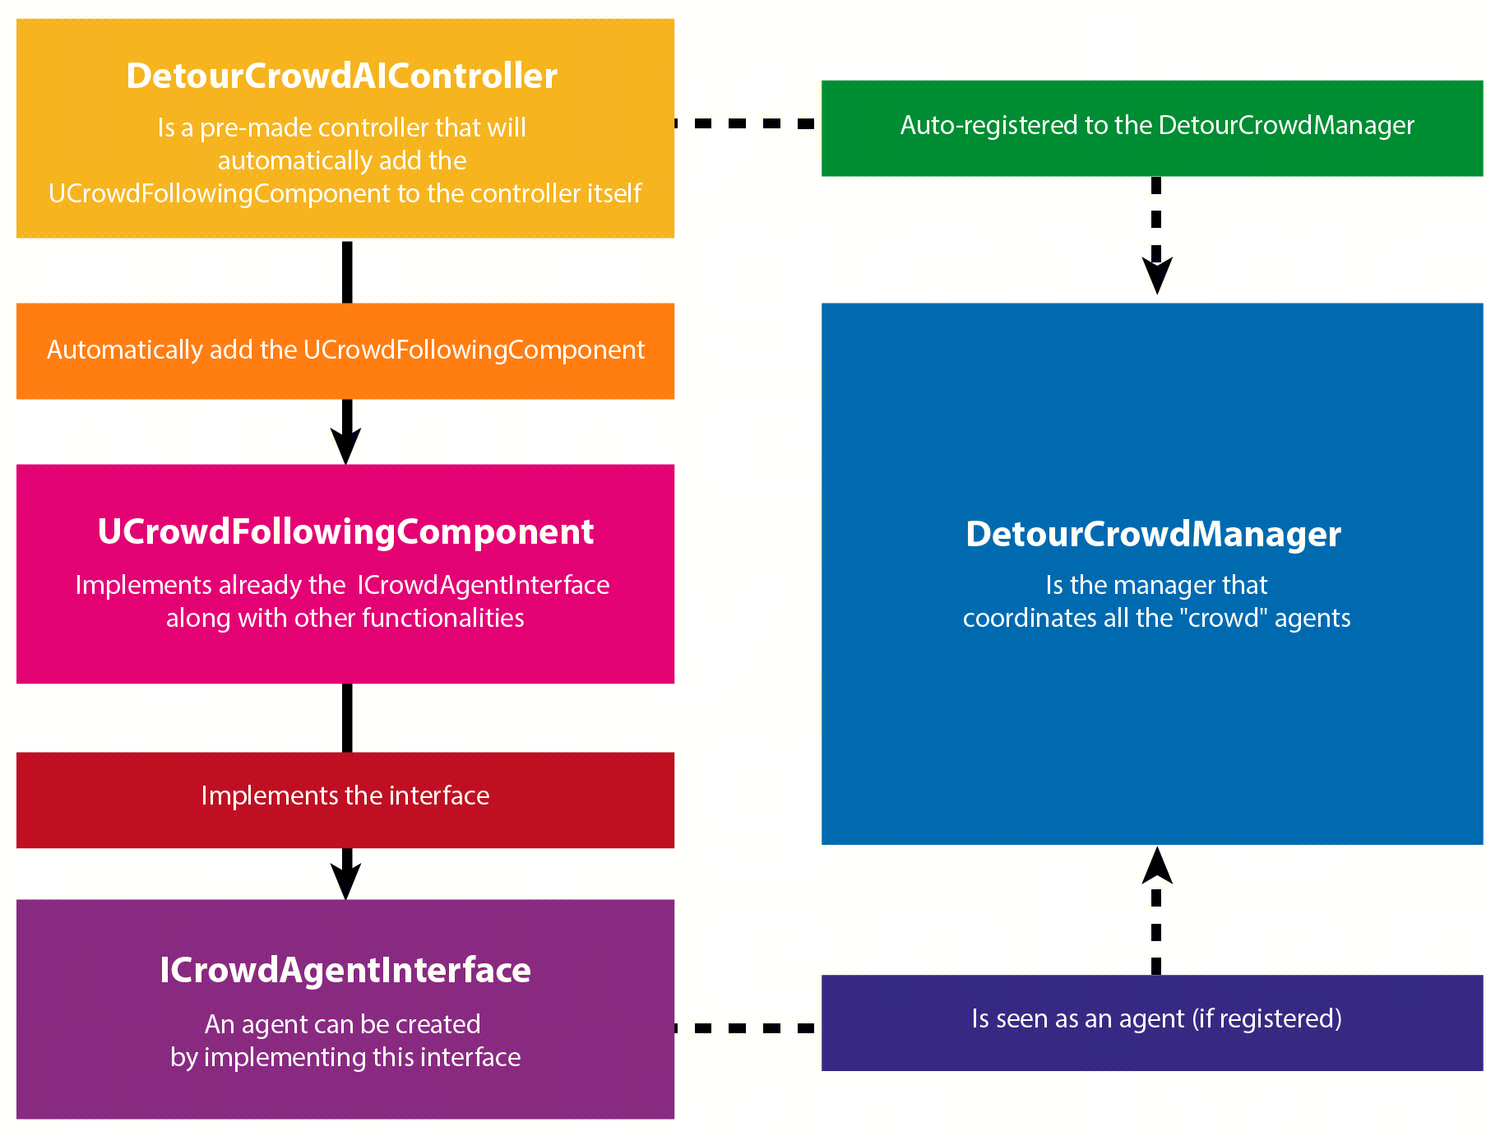
在UE中,Crowd避障是通过DetourController来给每个CrowdActor,通过控制NavAgent的前进方向来操控角色寻路、闪避其他Agent。见UCrowdFollowingComponent的398行:
1
2
3
4
5
6
7
8
9
10
11
12
13
14
15
16
17
18
19
20
21
22
23
24
25
26
27
28
29
30
31
32
void UCrowdFollowingComponent::ApplyCrowdAgentVelocity(const FVector& NewVelocity, const FVector& DestPathCorner, bool bTraversingLink, bool bIsNearEndOfPath)
{
	bCanCheckMovingTooFar = !bTraversingLink && bIsNearEndOfPath;
	if (IsCrowdSimulationEnabled() && Status == EPathFollowingStatus::Moving && MovementComp)
	{
		const bool bIsNotFalling = (MovementComp == nullptr || !MovementComp->IsFalling());
		if (bAffectFallingVelocity || bIsNotFalling)
		{
			UpdateCachedDirections(NewVelocity, DestPathCorner, bTraversingLink);

			const bool bAccelerationBased = MovementComp->UseAccelerationForPathFollowing();
			if (bAccelerationBased)
			{
				const FVector::FReal MaxSpeed = GetCrowdAgentMaxSpeed();
				const FVector::FReal NewSpeed = NewVelocity.Size();
				const FVector::FReal SpeedPct = FMath::Clamp(NewSpeed / MaxSpeed, 0., 1.);
				const FVector MoveInput = FMath::IsNearlyZero(NewSpeed) ? FVector::ZeroVector : ((NewVelocity / NewSpeed) * SpeedPct);

               //加速状态的NavMove
				MovementComp->RequestPathMove(MoveInput);
			}
			else
			{
               //非加速状态的NavMove
				MovementComp->RequestDirectMove(NewVelocity, false);
			}
		}
	}

	// call deprecated function in case someone is overriding it
	ApplyCrowdAgentVelocity(NewVelocity, DestPathCorner, bTraversingLink);
}
由此可见,UE实现的Detour是基于Recast的NavMesh上的,同时查询其他NeighborAgent来实现躲避。实现的核心代码在UCrowdManager的230行Tick函数中:
1
2
3
4
5
6
7
8
9
10
11
12
13
14
15
16
17
18
19
20
21
22
23
24
25
26
27
28
29
30
31
32
33
34
35
36
37
38
39
40
41
42
43
44
45
46
47
48
49
50
51
52
53
54
55
56
57
58
59
60
61
62
63
64
65
66
67
68
69
70
71
72
73
74
75
76
77
78
79
80
81
82
83
84
void UCrowdManager::Tick(float DeltaTime)
{
	if (DetourCrowd)
	{
		int32 NumActive = DetourCrowd->cacheActiveAgents();
		if (NumActive)
		{
			MyNavData->BeginBatchQuery();

			for (auto It = ActiveAgents.CreateIterator(); It; ++It)
			{
				// collect position and velocity
				FCrowdAgentData& AgentData = It.Value();
				if (AgentData.IsValid())
				{
					PrepareAgentStep(It.Key(), AgentData, DeltaTime);
				}
			}

			// corridor update from previous step
			{
				SCOPE_CYCLE_COUNTER(STAT_AI_Crowd_StepCorridorTime);
				DetourCrowd->updateStepCorridor(DeltaTime, DetourAgentDebug);
			}

			// regular steps
			if (bAllowPathReplan)
			{
				SCOPE_CYCLE_COUNTER(STAT_AI_Crowd_StepPathsTime);
				DetourCrowd->updateStepPaths(DeltaTime, DetourAgentDebug);
			}
			{
				SCOPE_CYCLE_COUNTER(STAT_AI_Crowd_StepProximityTime);
				DetourCrowd->updateStepProximityData(DeltaTime, DetourAgentDebug);
				PostProximityUpdate();
			}
			{
				SCOPE_CYCLE_COUNTER(STAT_AI_Crowd_StepNextPointTime);
				DetourCrowd->updateStepNextMovePoint(DeltaTime, DetourAgentDebug);
				PostMovePointUpdate();
			}
			{
				SCOPE_CYCLE_COUNTER(STAT_AI_Crowd_StepSteeringTime);
				DetourCrowd->updateStepSteering(DeltaTime, DetourAgentDebug);
			}
			{
				SCOPE_CYCLE_COUNTER(STAT_AI_Crowd_StepAvoidanceTime);
				DetourCrowd->updateStepAvoidance(DeltaTime, DetourAgentDebug);
			}
			if (bResolveCollisions)
			{
				SCOPE_CYCLE_COUNTER(STAT_AI_Crowd_StepCollisionsTime);
				DetourCrowd->updateStepMove(DeltaTime, DetourAgentDebug);
			}
			{
				SCOPE_CYCLE_COUNTER(STAT_AI_Crowd_StepComponentsTime);
				UpdateAgentPaths();
			}
			{
				SCOPE_CYCLE_COUNTER(STAT_AI_Crowd_StepNavLinkTime);
				DetourCrowd->updateStepOffMeshVelocity(DeltaTime, DetourAgentDebug);
			}

			// velocity updates
			{
				SCOPE_CYCLE_COUNTER(STAT_AI_Crowd_StepMovementTime);
				for (auto It = ActiveAgents.CreateIterator(); It; ++It)
				{
					const FCrowdAgentData& AgentData = It.Value();
					if (AgentData.bIsSimulated && AgentData.IsValid())
					{
						UCrowdFollowingComponent* CrowdComponent = Cast<UCrowdFollowingComponent>(It.Key());
						if (CrowdComponent && CrowdComponent->IsCrowdSimulationEnabled())
						{
							ApplyVelocity(CrowdComponent, AgentData.AgentIndex);
						}
					}
				}
			}

			MyNavData->FinishBatchQuery();
		}
	}
}
其中:
1
PrepareAgentStep`:刷新当前帧agent的初始位置`ag->npos`和速度方向`ag->vel
updateStepCorridor:根据当前ag->npos在NavMesh移动,更新寻路路径数据ag->corridor和合法ag->npos。
updateStepPaths:三个步骤分别是checkPathValidity:检查寻路路径否需要重新规划replan;updateMoveRequest:若需要replan,重新计算路径至ag->corridor ;updateTopologyOptimization:执行路径拓扑优化。
updateStepProximityData:计算NavMesh碰撞边界ag->boundary用于后面修正合法速度方向,以及邻居agentag->neis。
updateStepNextMovePoint:计算ag->ncorners于Offmesh有关。
updateStepSteering:计算ag->dvel,即到达目标位置所偏向的期望速度方向。
updateStepAvoidance:避障核心算法,根据邻居ag->neis生成Circle,ag->boundary边界生成Segment。根据调用sampleVelocity → sampleVelocityAdaptive → processSample 使用RVO算法生成正确前进方向ag->nvel。
updateStepMove:迭代agent位置ag->npos。
ApplyVelocity:使用上面计算的ag->nvel,调用UCharacterMovementComponent上的RequestPathMove,执行实际CMC移动。
DetourCrowd避障实现原理
启动流程
从AAIController::MoveTo入口开始,通过传递目标Actor/Location启用DetourCrowd寻路与避障,启动流程为:
1
UPathFollowingComponent::RequestMove → UCrowdFollowingComponent::SetMoveSegment → UCrowdManager::SetAgentMovePath → dtCrowd::updateAgentState → ag->state = DT_CROWDAGENT_STATE_WALKING;→ dtCrowd::updateStepAvoidance → dtObstacleAvoidanceQuery::sampleVelocity → dtObstacleAvoidanceQuery::sampleVelocityAdaptive → dtVcopy(nvel, res); → ...
Crowd模拟控制算法相关文章
更多Crowd算法可以参考下面博客:
https://gamma.cs.unc.edu/research/crowds/
包含模拟互动、个性特征、避障等算法的文章列表。